Table of Contents
In this article, we will focus on something that us developers use on a daily basis and to which we often don’t give it much importance (a common error from our part). I am talking about terminals, more specifically, a terminal multiplexer. Many of us are doing ok with just having a decent terminal with which we can run the 4 basic commands needed. But today I would like to talk about tmux.
I would like to focus on how to be more productive and efficient with a terminal, and as a bonus, you will be able to use this from any decent terminal, basically with linux and os x (I think that in the developer version of the new Windows 10, it could also be possible with its new terminal, but this is something that I don’t really know about).
What is Tmux? A terminal multiplexer.
Tmux is a “terminal multiplexer“. Basically it’s about being able to have several independent terminals in one terminal. To make sure we understand each other, it’s about dividing the window into panes or tabs within the terminal.
Lately, I have been working quite a bit on the frontend part and between things, I obligatorily need 4-5 windows and then a few others with which I complete tasks that don’t fall within my usual workflow. To give you a clear example, currently, in one of the projects I am working on I’ve got these services running:
- Webpack-dev-server for frontend
- TSC to compile typescript
- Karma for frontend testing
- Fake server – a nodejs server we use with static responses
- Backend – Docker in action (for integration testing before making a commit)
*Off-topic: Many might have been surprised to see that I have tsc and karma when karma already compiles and does all the necessary flow to run tests. I have the tsc because I am normally looking more at the IDE and I usually launch mocha tests on the compiled JS (it gives me feedback much faster).
These are the ones I use in my day to day, then, I do other types of tasks like ssh connections to remote servers, htop, yarn, etc. And all of that for one single project.
Tmux is not going to stop us from using a terminal (obviously), what it does is that it makes it easier for us to move through it. Let’s have a deeper look at it and get to know the concepts that tmux brings to us and check out the commands. Basically, here you’ll find a short tmux cheat sheet.
Tmux cheat sheet & shortcuts
Session
A session is nothing more than a collection of terminals managed by tmux server. This means that the session will be shown on the client’s side, but if the client does a tmux detach of that session, it does not mean that the session has been destroyed. The client can always re-access it (as long as he doesn’t delete it). A utility with this explanation is that if we have tmux on a remote server and that we lose the connection, we won’t loose anything because the tmux server will continue maintaining the state of the session, we just need to connect back to the server and attach the session.
Window
A window takes the entire screen of the terminal and it is within the sessions. A session can have multiple windows but can only display one at a time. A window can be divided into multiple panes with which we will work.
Pane
A pane is the part of the window in which the terminal we are working with is located. Here, there is no more mystery.
Installation
It is as easy as if you are working on Linux
$ apt-get install -y tmux
And if you are on mac
$ brew install tmux
Basic Commands for tmux
To start tmux just execute $ tmux on the terminal. This will launch a session of tmux with a name that will be put by the tmux itself. If we want to create a session with a name that suits us more, we would have to launch $ tmux new -s mySession.
With this, what we just did is that we opened a terminal with a bar below with something similar to this:
![]()
Here, it is informing us that we are in the session mySession and that we have a single window that has the name of the command that is being executed at the moment.
Before proceeding with the practical part you have to understand what the prefix is. The prefix is nothing more than a sequence of keys that press previous to any command of tmux. By default, it is Ctrl – b, on the internet they symbolize it as C-b. Just for your information, I would like to add that you have to press control and without releasing it, press b, it can then be released to launch the command of tmux.
Useful commands for the session
C-b + s – List of sessions in our tmux server
C-b + $ – Rename session
C-b + d – Detach current session (not about deleting it, just leaving it in the background). We go to the terminal and it will show us a message similar to [detached (from session mySession)].
Once outside the session, we can launch $ tmux ls to see the list of active sessions and attach again with $ tmux attach -t <name of the session>, eg:

If we want to create a new window within our session, we should press C-b + c, this would leave us the bar below like this:
![]()
Useful commands about windows
To be able to move between windows, there are several commands, I will explain the most used ones:
Prefix + p – Go to the previous window
Prefix + n – Go to the next window
Prefix + [number] – Go to a specific window (the number is shown right next to the window)
Prefix + & – Close the window (needs a confirmation)
Useful commands about panes
Once we have it clear on how to move through the different windows, we are going to divide these windows into different panes:
Prefix +% – Divide it vertically
Prefix + “ – Divide it horizontally
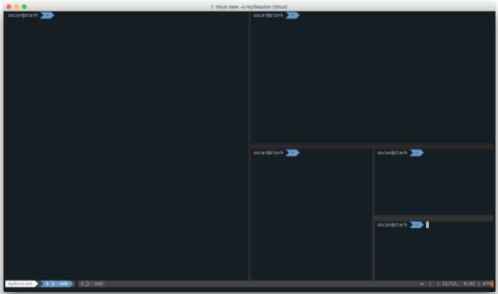
It’s actually quite easy, doing several tests, we could get something like this:

Now, what is left is to move between panes and several actions that are very common with the panes.
Prefix + [arrows] – Move between panes in the direction of the arrow
Prefix + x – Close pane
Prefix + z – Zoom to the active pane (Prefix + z again to zoom out)
Prefix + or – Next pane
Prefix + spacebar – Change the layout of the current panes
Prefix +! – Convert pane to window
Obviously this is something fairly basic with which you will improve productivity. Based on my experience, if you have just started, I would recommend you to do these commands, that you force yourself to always use tmux and once you feel comfortable, try to discover the wonderful world of making your own tmux configuration, install plugins and even map keys (for example, my prefix is C-a instead of C-b, something quite common in the tmux community).
Author
-
Software developer with over 16 years experience working as Fullstack Developer & Backend Developer.
View all posts


2 Comments
Nirmalya Sengupta
Quite useful for sure. Many thanks for sharing.
However, I am wondering, what if I simply have multiple _bash_ windows launched and leave them stacked on my screen, how will that be very different and/or more troublesome? Please make us wiser.
Oscar Galindo Villanueva
Well, at the end of the day it’s the same. When it comes to working with various opened terminals in different processes, tmux is one of the multiple means that is used and for me, one of the most useful (not only for me ofcourse, tmux has a large community that supports it).
As the end goal/result is the same, the only thing we can really talk about is the speed and easiness to do so. In your daily terminal boot process, you would open several terminals within the SO, you would resize them to fit on the screen so that you are more comfortable working, etc.
All of this is solved with tmuxp (a plugin of which I will speak in a future article). With this plugin, executing a single command would open a tmux with N windows/panes and each one with a concrete service opened. You also have the possibility to broadcast the multiple panes at once, save the current state of the session, have access to some useful information in the statusbar of tmux… The possibilities are endless and productivity increases.
If we add to tmux the use of VIM to develop (a topic that we will also talk about in future articles), this means that the entire development flow of a programmer will be concentrated inside a single terminal.