Table of Contents
In this article we are going to look at one of the service worker functions such as cache and offline mode.
To start, we will need a resource server. In Apiumhub we have created a small example server from where we will serve our html, js, css & other resources, it is made in Node for its simplicity. It also contains the service worker files that we will see next. LINK
Service worker: Caching strategies and offline mode
Combining the use of fetch API and cache API, we can create different caching strategies for our service workers. Some of the most common ones are detailed below.
Cache first
This strategy responds to requests within the resource version that is cached in the Cache Storage. If it is the first time and it does not find the cached resource, it will return the resource from the network and will store cache for the next time that is consulted.
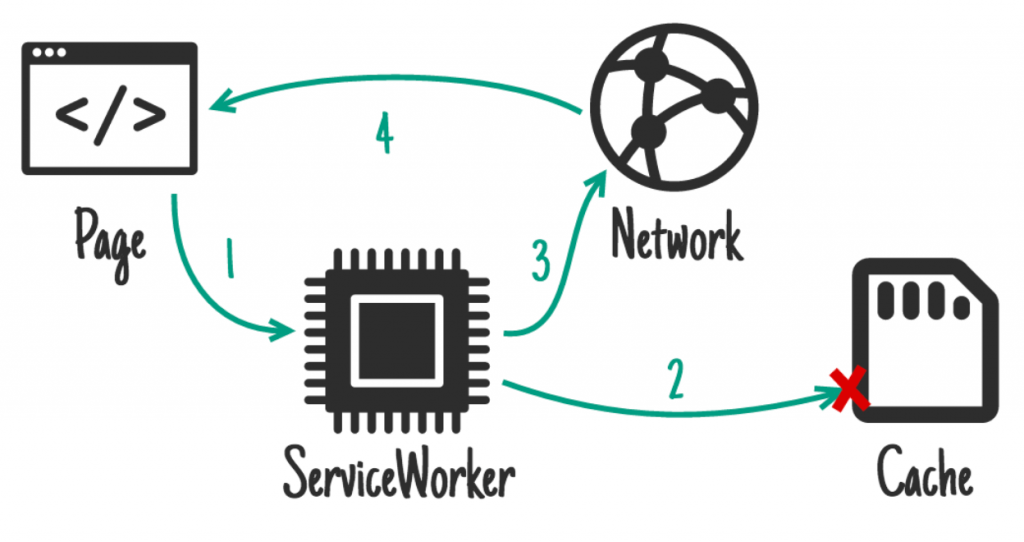
const cacheFirst = (event) => {
 event.respondWith(
   caches.match(event.request).then((cacheResponse) => {
     return cacheResponse || fetch(event.request).then((networkResponse) => {
       return caches.open(currentCache).then((cache) => {
         cache.put(event.request, networkResponse.clone());
         return networkResponse;
       })
     })
   })
 )
};
I usually use this strategy for media resources, such as images, videos & so on, since they are heavier resources and take longer to load.
Cache only
This strategy directly responds to requests with the cached version of the resource. If the cached version does not exist, it will return an error.
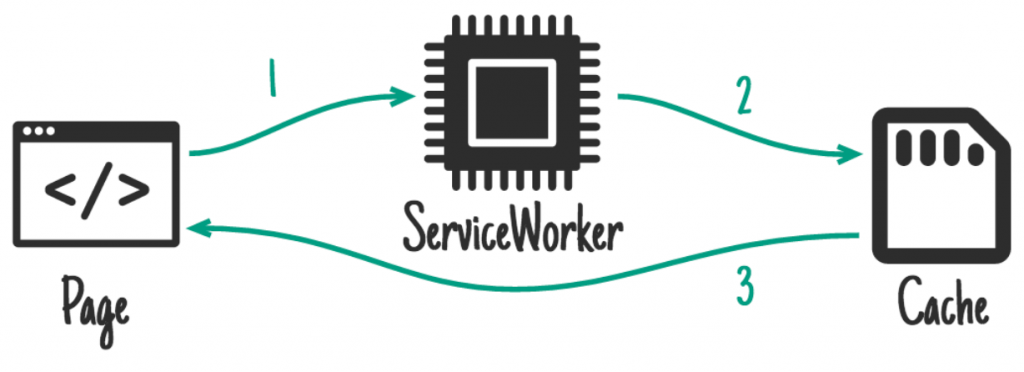
const cacheOnly = (event) => {
 event.respondWith(caches.match(event.request));
};
I have not found any use case for it.
Network first
This strategy prioritizes the most up-to-date resource version by trying to get it first over the network, even if a cached version already exists. If the network response is satisfactory, it will update cache. If there is an error in the network response it will return the resource directly from cache, if any.
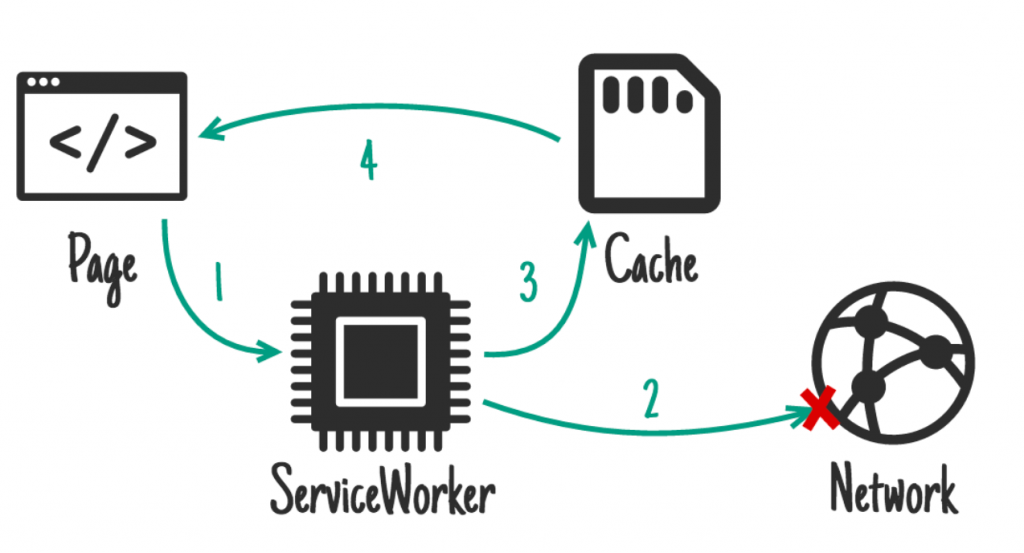
const networkFirst = (event) => {
 event.respondWith(
   fetch(event.request)
     .then((networkResponse) => {
       return caches.open(currentCache).then((cache) => {
         cache.put(event.request, networkResponse.clone());
         return networkResponse;
       })
     })
     .catch(() => {
       return caches.match(event.request);
     })
 )
};
I usually use it in api calls, where the frequency of content change is very low and it is not critical to return the latest content version. With this, I prioritize new content and I give place for the offline mode, where we will see the data version from our last session having connection.
Network only
This strategy always prioritizes the most updated resource version, obtaining the desired network. If the request fails, it will return an error.
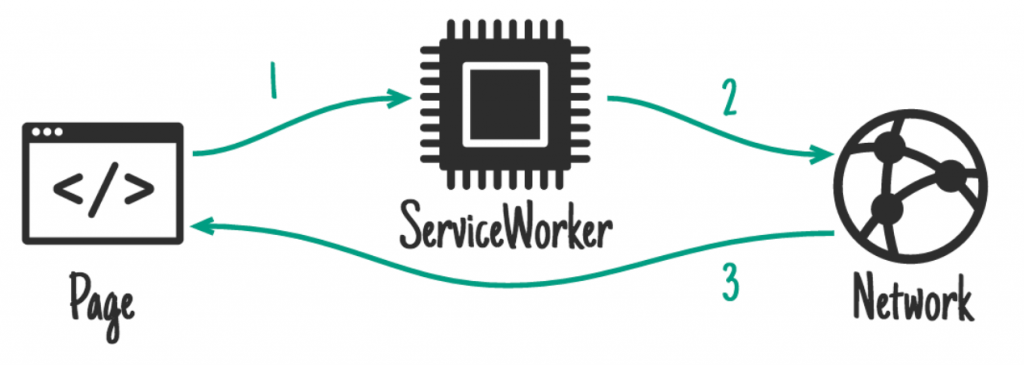
const networkOnly = (event) => {
 event.respondWith(fetch(event.request));
};
I usually use it for api calls, where it is critical that the version of the data we display is the latest. For example, if a product is already out of stock, we should not get a cached response such as { stock: 5 }.
Stale while revalidate
With the combination of the previous strategies, we can create our own customized strategy, as in this case.
This strategy prioritizes the cached content to load the resources instantly (cache first) and in parallel makes a request to the network to update the cache content with the latest version of the resource for future requests. If there is nothing in cache the first time, it will make a network first request.
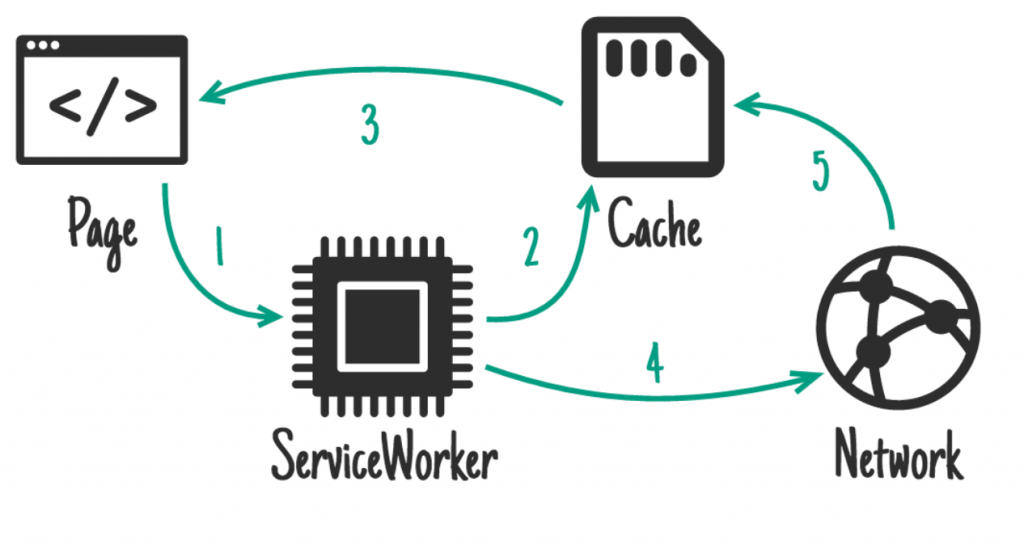
const staleWhileRevalidate = (event) => {
 event.respondWith(
   caches.match(event.request).then((cacheResponse) => {
     if (cacheResponse) {
       fetch(event.request).then((networkResponse) => {
         return caches.open(currentCache).then((cache) => {
           cache.put(event.request, networkResponse.clone());
           return networkResponse;
         })
       });
       return cacheResponse;
     } else {
       return fetch(event.request).then((networkResponse) => {
         return caches.open(currentCache).then((cache) => {
           cache.put(event.request, networkResponse.clone());
           return networkResponse;
         })
       });
     }
   })
 );
};
I usually use it for static files like css, js, etc. since they only change when a new code deployment is made.
Testing our service worker
Now that we know the different caching strategies and that we can create our own custom ones, it’s time to see an example of a working service worker.
Our project consists of the following files:
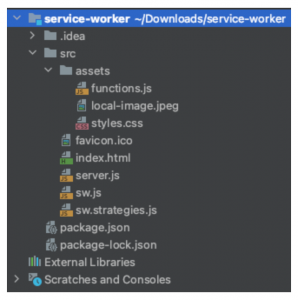
- index.html, is the main page from where the service worker will register.
- sw.js, is the service worker itself.
- sw.strategies.js, contains different strategies implemented to be used from our service worker.
- assets, is a folder where the images, scripts and styles files are.
In the index.html file we will have the script to register the service worker.
if ('serviceWorker' in navigator) {
 window.addEventListener('load', function() {
   navigator.serviceWorker.register('/sw.js').then(function(registration) {
     console.log('SW registration successful with scope: ', registration.scope);
   }, function(err) {
     console.log('SW registration failed: ', err);
   });
 });
}
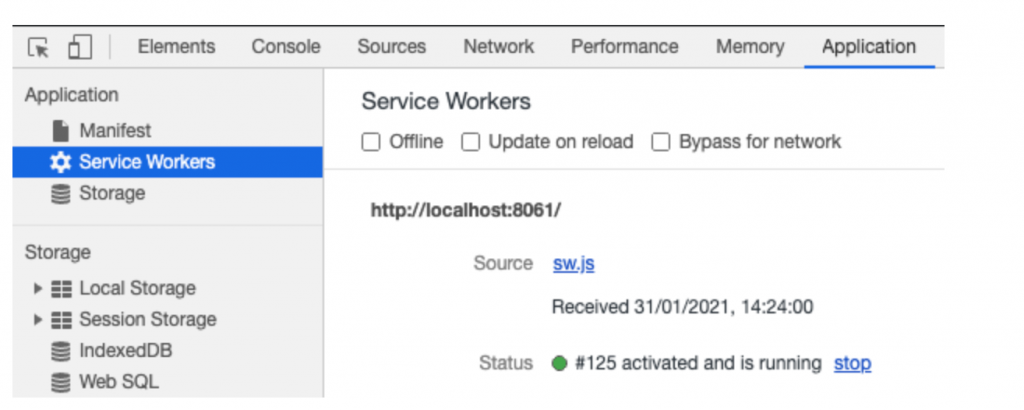
If the registration has worked correctly, we will be able to see our registered service worker as in the following image:
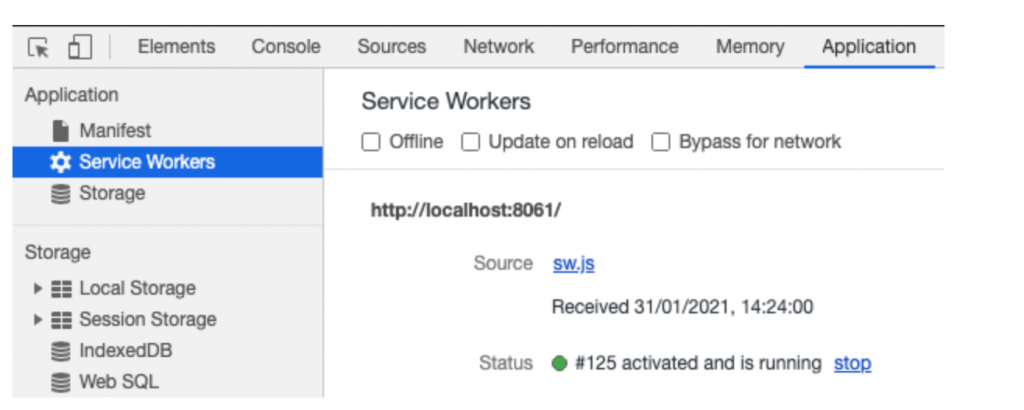
Our service worker consists of two parts, the first to capture the requests and/or cache them.
const router = {
 find: (url) => router.routes.find(it => url.match(it.url)),
 routes: [
   { url: `^http://apiumhub.com:[0-9]{1,5}
In this article we are going to look at one of the service worker functions such as cache and offline mode.
To start, we will need a resource server. In Apiumhub we have created a small example server from where we will serve our html, js, css & other resources, it is made in Node for its simplicity. It also contains the service worker files that we will see next. LINK
Service worker: Caching strategies and offline mode
Combining the use of fetch API and cache API, we can create different caching strategies for our service workers. Some of the most common ones are detailed below.
Cache first
This strategy responds to requests within the resource version that is cached in the Cache Storage. If it is the first time and it does not find the cached resource, it will return the resource from the network and will store cache for the next time that is consulted.

const cacheFirst = (event) => {
 event.respondWith(
   caches.match(event.request).then((cacheResponse) => {
     return cacheResponse || fetch(event.request).then((networkResponse) => {
       return caches.open(currentCache).then((cache) => {
         cache.put(event.request, networkResponse.clone());
         return networkResponse;
       })
     })
   })
 )
};
I usually use this strategy for media resources, such as images, videos & so on, since they are heavier resources and take longer to load.
Cache only
This strategy directly responds to requests with the cached version of the resource. If the cached version does not exist, it will return an error.

const cacheOnly = (event) => {
 event.respondWith(caches.match(event.request));
};
I have not found any use case for it.
Network first
This strategy prioritizes the most up-to-date resource version by trying to get it first over the network, even if a cached version already exists. If the network response is satisfactory, it will update cache. If there is an error in the network response it will return the resource directly from cache, if any.

const networkFirst = (event) => {
 event.respondWith(
   fetch(event.request)
     .then((networkResponse) => {
       return caches.open(currentCache).then((cache) => {
         cache.put(event.request, networkResponse.clone());
         return networkResponse;
       })
     })
     .catch(() => {
       return caches.match(event.request);
     })
 )
};
I usually use it in api calls, where the frequency of content change is very low and it is not critical to return the latest content version. With this, I prioritize new content and I give place for the offline mode, where we will see the data version from our last session having connection.
Network only
This strategy always prioritizes the most updated resource version, obtaining the desired network. If the request fails, it will return an error.

const networkOnly = (event) => {
 event.respondWith(fetch(event.request));
};
I usually use it for api calls, where it is critical that the version of the data we display is the latest. For example, if a product is already out of stock, we should not get a cached response such as { stock: 5 }.
Stale while revalidate
With the combination of the previous strategies, we can create our own customized strategy, as in this case.
This strategy prioritizes the cached content to load the resources instantly (cache first) and in parallel makes a request to the network to update the cache content with the latest version of the resource for future requests. If there is nothing in cache the first time, it will make a network first request.

const staleWhileRevalidate = (event) => {
 event.respondWith(
   caches.match(event.request).then((cacheResponse) => {
     if (cacheResponse) {
       fetch(event.request).then((networkResponse) => {
         return caches.open(currentCache).then((cache) => {
           cache.put(event.request, networkResponse.clone());
           return networkResponse;
         })
       });
       return cacheResponse;
     } else {
       return fetch(event.request).then((networkResponse) => {
         return caches.open(currentCache).then((cache) => {
           cache.put(event.request, networkResponse.clone());
           return networkResponse;
         })
       });
     }
   })
 );
};
I usually use it for static files like css, js, etc. since they only change when a new code deployment is made.
Testing our service worker
Now that we know the different caching strategies and that we can create our own custom ones, it’s time to see an example of a working service worker.
Our project consists of the following files:

- index.html, is the main page from where the service worker will register.
- sw.js, is the service worker itself.
- sw.strategies.js, contains different strategies implemented to be used from our service worker.
- assets, is a folder where the images, scripts and styles files are.
In the index.html file we will have the script to register the service worker.
if ('serviceWorker' in navigator) {
 window.addEventListener('load', function() {
   navigator.serviceWorker.register('/sw.js').then(function(registration) {
     console.log('SW registration successful with scope: ', registration.scope);
   }, function(err) {
     console.log('SW registration failed: ', err);
   });
 });
}
If the registration has worked correctly, we will be able to see our registered service worker as in the following image:

Our service worker consists of two parts, the first to capture the requests and/or cache them.
, handle: strategy.staleWhileRevalidate },

{ url: `^http://apiumhub.com:[0-9]{1,5}/.*\.html`, handle: strategy.staleWhileRevalidate },

{ url: `^http://apiumhub.com:[0-9]{1,5}/.*\.css`, handle: strategy.staleWhileRevalidate },

{ url: `^http://apiumhub.com:[0-9]{1,5}/.*\.js`, handle: strategy.staleWhileRevalidate },

{ url: `^http://apiumhub.com:[0-9]{1,5}/.*\.jpeg`, handle: strategy.cacheFirst }

]

};

self.addEventListener("fetch", event => {

const found = router.find(event.request.url);

if (found) found.handle(event);

});
And the second part, a mechanism to reset in case we need to empty the cache completely if we have any cache first. All resources will be stored in a v1 cache until we manually change the key to v2 for example.
const currentCache = 'v1'; // ← CHANGE IT TO RESET CACHE
self.addEventListener('activate', event => {
 event.waitUntil(
   caches.keys().then(cacheNames => Promise.all(
     cacheNames
       .filter(cacheName => cacheName !== currentCache)
       .map(cacheName => caches.delete(cacheName))
   ))
 );
});
Finally, if we load the page and everything has worked fine, we should see our cached resources as in the following image:
And this has been our explanation today, in the next article we will see how to do something similar using the Google workbox library.
Author
-

Fullstack with more than 17 years of experience in different professional projects. Interested in new technologies and applying best practices for continuous improvement.
View all posts
