Table of Contents
In this article, we will discuss about how to capture the traffic of our Android application using a tool called Charles Proxy. I recommend you continue reading, you will love it! At least we love here at Apiumhub.
Developing a Web application is immediately viewing and analyzing all HTTP requests that are made. Client requests and server responses are easily traceable and reproducible. Instead, when you are working with a mobile device, both physical and virtual, the analysis of this traffic is not as trivial.
Therefore we will present a tool that is very useful, as much in the case covered in this article, as in many others, Charles Proxy.
This tool can be used to monitor all HTTP and HTTPS traffic, using for it certificates that the Proxy itself provides us, with a duration of 24 hours.
SETUP CHARLES PROXY
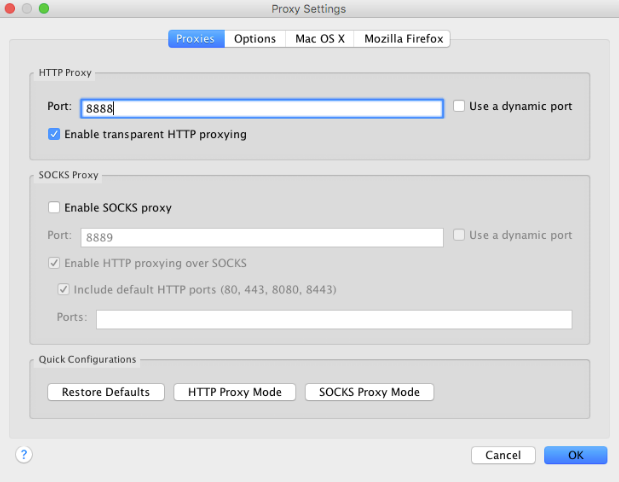
First of all we will configure our Charles Proxy. To do this, let’s Proxy in the menu and follow those steps:
- Proxy > Proxy Settings: We leave the port as default and activate “Enable transparent HTTP Proxying”
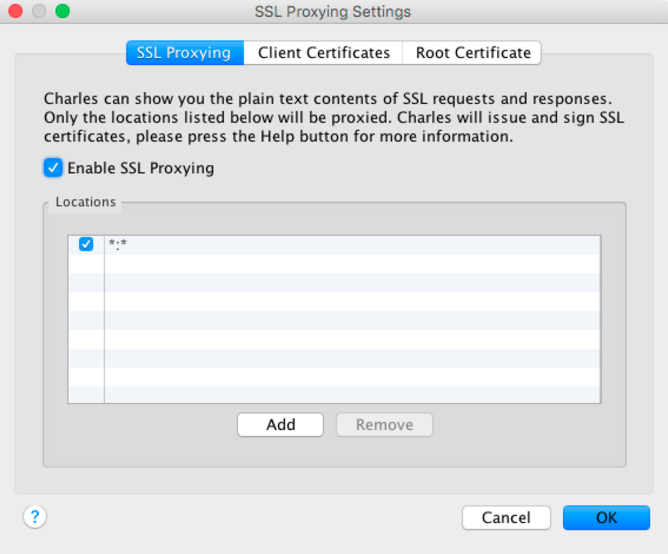
- Proxy > lL Proxy Settings: Activate “Enable SSL Proxying” and we add a new entry in Locations (Host: *, Port: *)
HOW TO SET UP ANDROID EMULATOR
Once we set up Charles Proxy, we are going to set up our Android emulator. For that, when the time of launching it arrives, we will need to pass the IP of our Charles Proxy as an environment variable (in Charles Proxy: Help > Local IP Address), with something similar to the following command:
emulator -netdelay none -netspeed full -avd <emulador> -http-proxy http://<ip-proxy>:8888
(If we have changed the port for another when we had to set up the Charles, we also have to change the port value)
Once the emulator is opened, we will install the certificate that gives us Charles Proxy by opening from our mobile browser this url. A dialog will automatically appear to install a new certificate on mobile as shown in the following picture:
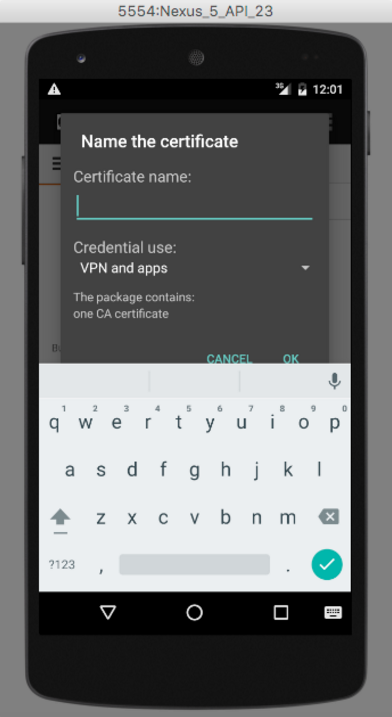
It should be enough by putting a name and accepting the installation. Once all these steps are done, we go to Charlesproxy and click on the button “Start Recording” (Or also, from Proxy > Start Recording) and from now you will have any HTTP/HTTPS traffic exiting from the mobile. I leave you with a screenshot of the final result:

If you are interested in receiving job offers in Barcelona, tips regarding Charles Proxy, and software development in general, subscribe to our newsletter here.
If you enjoyed reading this article about Charles Proxy, you might like…
- F-bound over a generic type in Scala
- This TMUX guide will increase your productivity
- Simulate server responses with Nodejs
- Dockerize a multi-module Scala project with SBT
Before I leave you, I would just like to mention that if you’re looking for a new job opportunity as a software developer, you should definitely have a look at our job vacancies.
Author
-
Software developer with over 16 years experience working as Fullstack Developer & Backend Developer.
View all posts





9 Comments
eric
which emulator did you use?
thanks!
Oscar Galindo Villanueva
For this article I’m using the default but I usually use genymotion,
Thanks!
Danny
My andriod is still returning encrypted and unreadable
Oscar Galindo Villanueva
This problem could be because of SSL Pinning, you should read this article to learn more about it: https://medium.com/@appmattus/android-security-ssl-pinning-1db8acb6621e
Pranshu Agarwal
On which Android Version you are checking? If it is Nougat (Android 7) and above then you to put some extra effort
Oscar Galindo Villanueva
This line is used to open the emulator with some custom configuration, we use this for set http proxy to charles,
Thank you!
Jonnathan
How can I remove the proxy from my emulator device?
Gutte
Charles showing the outgoing calls with the IP address and not the domain. any idea how to fix this?
Gutte
found solution: https://stackoverflow.com/a/46054993/4231147